måndag 25 april 2016

Magic ~ Dusty Attic

Hi everybody! Dusty Attic has another stunning moodboard this month, and since I love purple this was extra special to create with. 

To create the background on this page, I simply painted with clear gesso and then used mists, white gesso (mixed with some water to make it thinner) and embossing powder (purple) from Colour Blast. 


Here's the moodboard for this month:


And here are the Dusty Attic pieces I used:


Ivy Corners #2


Ornate Frame Set (I used the smaller piece).

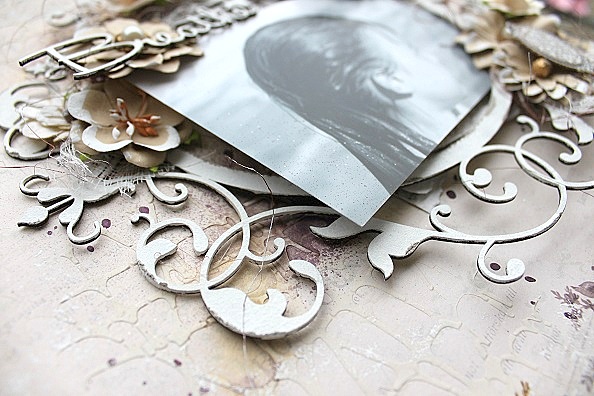
I painted all the chippies with white gesso, and then I used embossing powder to get both color and structure. For the frame I used the purple powder from Colour Blast, and also bronze powder. On the Ivy Corners, I used light blue powder on the leaves, and also some bronze powder, just on the edges. 

I also used some purple embossing powder on some of the Dusty Attic flowers (Dusty in Bloom, Evening Blush).

And here are some close-ups for you!


Thank you for stopping by today!

xoxo
Helena

söndag 24 april 2016

Cards ~ Scrapberrys

Hi! Today I'm sharing two cards I made for Scrapberrys. I am a guestdesigner there this month, and got so many beautiful papers and embellies to play with! These Tea Party resin pieces are beautiful, and I just had to use them on these cards:


onsdag 6 april 2016

Cherish Yesterday ~ Dusty Attic

Hi there! Helena here today to share some Dusty Attic inspiration with you. For this layout, I have used a photo of one of my sisters and a friend of hers. The photo was taken some years ago, and I thought the title "Cherish Yesterday" suited this page well.


I have used the Bedazzled (DA1482) stencil in the background, with Dusty Attic texture paste and mists in gray and peach/pink. I have also used a corrugated card (DA0830) in the background. 

The Luxury Scroll (DA1353) is an amazing piece of art:


I first painted the chippie with white gesso, then I used gray embossing powder and some Dusty Attic rusting powder together. After heating I sprayed some dark gray mist over it. The result was marble-like, and I love it! I treated the Swirly Vines #3 (DA0751) almost the same way, just used a dark purple mist in the end instead.


The title "Cherish Yesterday" I just misted with all the mists previously used.

Here are some close-ups for you!


Thanks for stopping by today!

xoxo
Helena


tisdag 5 april 2016

Love ~ Scrapberrys

Hi! I have some happy, scrappy news today! I am guest designing for Scrapberrys this month, and here is my first project, a layout. I have used Scrapberrys "You & Me" collection and lots (and lots!) of their gorgeous embellishment. Everything on this page (except color, texturepaste and stencil), can be found at Scrapberrys. Amazing products, and I had so much fun creating with them!


Lots of layers!


Beautiful paper flowers and resin flowers!


xoxo

Helena


måndag 21 mars 2016

Breathe ~ Dusty Attic

Hi! The layout I'm sharing today is made using the Dusty Attic moodboard this month. It is a stunner, so it was easy creating using these colors. Here's the moodboard:


And here's my layout:


I created a soft and romantic page, painting all the chippies with white gesso and then distressed some of them a bit. I have used papers from Pion Design (For Father collection), perfect colors!

In the background I have used the Cracked Stone Stencil (DA1392) with Dusty Attic texture paste.

The Ornate Frame (DA1467) is a real beauty, and thankfully there are two in this set, so I have a smaller one left for another project!


In the upper left corner I have used two Ornate Pendants (DA1359), layered them and put a little metal spoon from Prima on top. For no other reason than because it looked pretty there ;)

The title "Breathe" is from Word Pack #10 (DA166).


I also put the Ivy Flourish (DA1460) on the frame. 


Thank you for stopping by today!

xoxo
Helena


söndag 6 mars 2016

Amazing Moments ~ Dusty Attic

Hi! Winter is almost over here in Sweden, and now we all long for Spring! Today's layout is "wintery" though, in white, turquoise and silver.

I have used the gorgeous new Vintage Frame #4 (DA1510), both sizes. I painted them white and then added some glitter snow on the edges. The Branches and Berries (DA0729) was also painted white. i then added some turquoise liquid pearls on the berries. 


Gorgeous flowers from Petaloo:


The title "Amazing Moments" is from Word Caption #6 (DA1385). I kept this piece raw to make it show against all the white.


In the backgound I have used the Fan stencil (DA1320) with clear gesso and mists.


Thank you for stopping by today!

xoxo

Helena


söndag 21 februari 2016

Little Moments ~ Dusty Attic

Hello! Helena here today, sharing my Dusty Attic moodboard layout for February. I really loved this one! I pulled out some of my old Pion Design papers and lots of beautiful Dusty Attic chippies, flowers and stencils, and started to play. I have a little tutorial on how I made the background, in the end of this post. But first, the layout, the moodboard and some close-ups!


I did a lot of layering on this layout, both papers, flowers and chippies. I love layering!!

The amazing frame is called Swirly Frame (DA1468) and I have cut it in two pieces and layered these around the picture. 

I have painted the frame and the scrolls from Scroll set #1 (DA1466) with white gesso and then with Colour Paste from Colour Blast (Just Blue). I added some water to the paste and then used a small brush to paint on both chippies and paper. Amazing colour!! You can find Colour Blasts products at the Dusty Attic website!


The title Little Moments is from Mini Captions #6 (DA1385). I kept this piece raw, just added a bit of gesso on the edges.


I have also added some Stars #3 (DA115), painted white.


Some Dusty in Blooms, Blue Bonnet (DA0807), peeking out!


And here's the background tutorial:

1. I started by tearing my papers a bit (Pion Design papers, from the For Father collection).


2. I then used the Creative Script stencil (DA1494) with clear gesso (makes paint and ink blend together beautifully).


3. Then I used the same stencil with Dusty Attic texture paste:


4. I then sprayed gray and light blue mist on the stenciled parts and let the colour run and blend together.


5. For stability and good looks: a corrugated card in the back (DA0830):


Finished! After I finished layering papers, chippies and flowers, I added the Colour Paste and some script washitape. 


Thank you for stopping by today! I hope you've enjoyed my layout and tutorial. Don't forget to add your own entry to this months moodboard!

xoxo

Helena